MV Telemetry – Part 2 NUC-NUC

Hello and welcome to Part 2 of my blog posts series on building out the telemetry systems for MV Adventuress. In this post I am going to cover in detail how I built out the software for the Intel NUC. If you need a refresher on the overall components of our telemetry system go here for Part 1. My wife and I affectionally refer to our server as NUC-NUC and the little beast handles all our compute needs for Adventuress.
To recap the hardware details for of the installation of NUC-NUC are as follows.
- Intel NUC 10 with Intel Core i5 1.6 GHz with 8 cores
- 2 x Kingston 8G SO-DIMM 2667 MHz
- Kingston NVMe 500G drive (OS)
- Samsung SSD 1.9TB drive (Storage)
- Winford Engineering 4×4 DIN mount plate
- 19V DC/DC Voltage Converter
- HDMI Display Emulator
- 32 GB USB Key
- External KVM for setup only
One goal when selecting a server platform for the boat was to have something that could run at low power, be wall mounted, and did not require AC power. The NUC ticked off all those boxes. Using a NVMe as the OS drive puts the OS on a fast and power efficient storage source. The other important benefit is that the NUC is designed for passive cooling. Fans consume quite a bit of energy and that consumption is not linear with speed.
Getting the OS Installed
Having used Unix in one form or another for most of my life I decided to install Ubuntu. Because in some rare cases I wanted to remote desktop in I went with Ubuntu 20.04 LTS desktop version. For yourself just grab whatever is the latest long term build of the month. Ok for the install your going to need to make a bootable USB key with the OS you just downloaded. For my Mac I used a program called balenaEtcher to install the Ubuntu system install iso file onto the USB and make it bootable. Google how to do that as it is dependent on your laptop OS version. Once you have a bootable USB key temporarily hook up your keyboard, monitor, and mouse and boot the NUC. On my version of the NUC I needed to go into the BIOS first and disable secure boot so that the NUC would boot off the USB key. Also this is a good time to make sure the BIOS sees your hardware installed in it. I installed the OS itself on the NVMe drive so that the OS and further applications are sitting on the very fast NVMe drive. Once the installation comes all the way up the first thing I do is make sure that I can access the server through SSH. Congratulations to all, the server is now up with bare minimum viability.
Now the OS has been successfully installed it is time to install applications. I will break this up into two phases. Apps to make using and maintaining Ubuntu easier and applications for my telemetry project.
OS Management Apps
Log into the command line on the server with your method of chose. Now lets get started. Any of the install commands assume you need to use run as super user. Time to update the list of packages available for your server by running sudo apt-get update. Once you have updated the list of available packages the next step is to bring the server up to the most recent patch levels by running sudo apt-get upgrade. Ok for each package below you will run the command sudo apt-get install <package name>
- Install openssh-server ( SSH Daemon update + SCP support )
- Install htop ( Allows you to view memory / cpu utilization )
- Install cpulimit ( Allows you to limit cpu of an app such as handbrake )
- Install lm-sensors ( To monitor various hardware on NUC )
- Install nvme-cli ( To monitor state on NVMe drive )
- Install vino ( To setup remote desktop on VNC )
- Install screen ( Part of remote desktop setup )
- Install samba ( Optional for file sharing to Mac )
- Insall plex ( Optional for sharing movie and music )
Remote Desktop
Time to get remote desktop up and running. First, I turn off encryption. Since I am always connecting on my local boat network it’s one less thing to go wrong. Run the command gsettings set org.gnome.Vino require-encryption false to turn off encryption. Next follow the steps at howtogeek to setup remote desktop. Once that is complete than you should setup auto-login for a headless unit install. If you do not configure autologin you may encounter a blank black screen on remote login. Instructions for that are here.
Samba
Our household runs on the Mac OS and so we needed a way to do file sharing from our various libraries stored on the NUC to our Macs. So Samba to the rescue. You will need to edit your /etc/samba/smb.conf file to add in the network shares. Below is an example set of config to add a file share called Movies to the server. I added this to the bottom of the smb.conf file.
[Movies]
comment = Movie Share
path = /media/ssd-internal/Movies
read only = no
browsable = yes
guest ok = no
I decided to use user based security with Samba to help tighten things up. You can read the article to change Samba security here.
UFW Config
So this is an area where other install guides don’t really cover but, you need to turn on a firewall on your Ubuntu server. The last thing you want is another device on your network to be compromised and spring board to your server where you have put all this time and effort into. UFW is Ubuntu’s firewall app and is pretty easy to configure. So three steps here to configure UFW. 1.) create application profiles 2.) configure UFW 3.) start UFW.
UFW has a concept of application profile that specifies a nice tidy object of information to use in applying UFW policy. Policies are located in /etc/ufw/application.d . Each application has it’s own text file located in the directory. Here is a list of policy files I have. You can just copy a section into a text file in your own system and save each in the /etc/ufw/application.d directory.
[SignalK]
title=SignalK Server
description=SignalK NEMA2000 gateway server
ports=3000,10110/tcp
[Grafana]
title=Grafana
description=Grafana GUI interface
ports=4000/tcp
[Influxdb]
title=Influxdb
description=Ports used to manage and send data to Influxdb
ports=8086,8088/tcp
[OpenSSH]
title=Secure shell server, an rshd replacement
description=OpenSSH is a free implementation of the Secure Shell protocol.
ports=22/tcp
[Venus]
title=Victron Venus
description=Allow communication between Victron Venus GX and SignalK
ports=78/tcp
[VNC]
title=Vino Server
description=Vino is the VNC server for the GNOME desktop environment
ports=5900/tcp
Now that you the application profile defined it’s time to add them into UFW and create some policies. I show an example of adding Grafana policy object add then the UFW rule to allow anyone on the local boat network of 192.168.1.0/24 to access Grafana on the server. Last I show the UFW policy.
sudo ufw app update grafana
sudo ufw allow from 192.168.1.0/24 to any app Grafana
sudo systemctl restart ufw
signalk@voyager:~$ sudo ufw status numbered
Status: active
To Action From
— —— —
[ 1] VNC ALLOW IN 192.168.1.0/24
[ 2] Samba ALLOW IN 192.168.1.0/24
[ 3] Influxdb ALLOW IN 192.168.1.0/24
[ 4] SignalK ALLOW IN 192.168.1.0/24
[ 5] Plex ALLOW IN 192.168.1.0/24
[ 6] OpenSSH ALLOW IN 192.168.1.0/24
[ 7] CUPS ALLOW IN 192.168.1.0/24
sudo ufw allow from 192.168.1.0/24 to any app Grafana
sudo systemctl restart ufw
SignalK
Ok on to the main event which is SignalK. First there are a lot of good articles on SignalK on the web to get started with the installation. Seabits has a good article here that shows how to install SignalK + Influxdb + Grafana. In addition the code repo itself for SignalK has an installation document. I followed Steve Mitchell’s article on installation pretty closely so I don’t feel the need to recover the installation of the three applications SignalK, Influxdb, and Grafana.
My notes boil it down to a few quick and easy steps.
- Install Node JS: sudo apt install nodejs
- Install Node JS Node Package Manager (NPM): sudo apt install npm
- Update Node JS NPM: sudo npm install -g npm@latest
- Install multicast DNS: sudo apt install libavahi-compat-libdnssd-dev
- Install Node JS SignalK: sudo npm install -g –unsafe-perm signalk-server
- Setup SignalK: sudo signalk-server-setup
- Check Status: systemctl status signalk.service
A few items of helpful file reference locations
- Logs installed in /home/signalk/.signalk/logs
- Server settings in /home/signalk/.signalk/settings.json
- Plugin settings in /home/.signalk/plugin-config-data
Login into SignalK server. I turned off encryption for the SignalK web server. Assuming my ip address is 192.168.1.100 for my server I would use http://192.168.1.100:3000
Actisense NMEA 2k Gateway
The good news is I did not need any additional drivers to support the Actisense NGT-1 gateway in Ubuntu. You just need to find where the NGT-1 device is mapped to in the system. You can run the following command after plugging in the NGT-1 dmesg | grep -i ‘usb’ and then look at the output. If I run ls /dev/tty*USB* the output shows NGT-1 is mapped to /dev/ttyUSB0. Go to SignalK dashboard and add a connection using the mapping information. The SignalK install guide linked above has examples for the NGT-1. Restart SignalK and away you go! You know it’s working correctly when you have a device on your N2K network generating data and you look in the Data Browser page in SignalK and see PGN data flowing in!
Grafana
Few quick notes on Grafana. I will cover in a separate post on how I created my dashboards itself. There where however, two tweaks I did in the configuration file at /etc/grafana/grafana.ini . I changed the default web port it uses from 3000 -> 4000 so it does not conflict with SignalK. The second change is I changed the domain from localhost -> ip address of the server.
# The http port to use
http_port = 4000
# The public facing domain name used to access grafana from a browser
domain = 192.168.1.115
;domain = localhost
Back that Sucker Up!
Ok through the blood, sweat, and tears you made it to the boat where everything is working. Now is the time once the NUC is dialed in to back it up. I use an external USB3 HD for speed of backup. I copy all my data files over with a few commands and then move onto the OS. So if your new to Linux it’s time to uncork those google skills and look up how to format and mount USB devices. A ton of information online so I won’t cover that here.
So first my data libraries. There are about 7 main data folders stored on the internal SSD drive. In my NUC the internal SSD is mounted under /media/ssd-internal/ . Say if I want to back up my Movies folder located on the SSD to an external usb drive mounted at /media/usb-external/ I would use the below command. Rinse and repeat for a few parent folders and done. I do it this way as most of the data folders are pretty stagnant.
rsync -arp -v –ignore-existing /media/ssd-internal/Movies /media/usb-drive/
For the OS itself that is on the NVMe drive it’s a little more complex. I want a complete snapshot of everything wrapped up in the event I need to restore the OS. I run this first command that backs up the OS and skips of the temporary, cache, other mounted drives, and home folders.
sudo nohup tar -cvpzf /media/ssd-os-backup/backup-05-09-21.tar.gz –one-file-system /
Next I DO actually want the home folders and it was easier to archive the home folder with it’s own command.
sudo nohup tar -cvpzf /media/ssd-os-backup/backuphome-05-09-21.tar.gz –one-file-system /home/
Ok. Now you have two compressed tar files that hold the complete OS and all of your user folders. Time to get a beer!
Summary
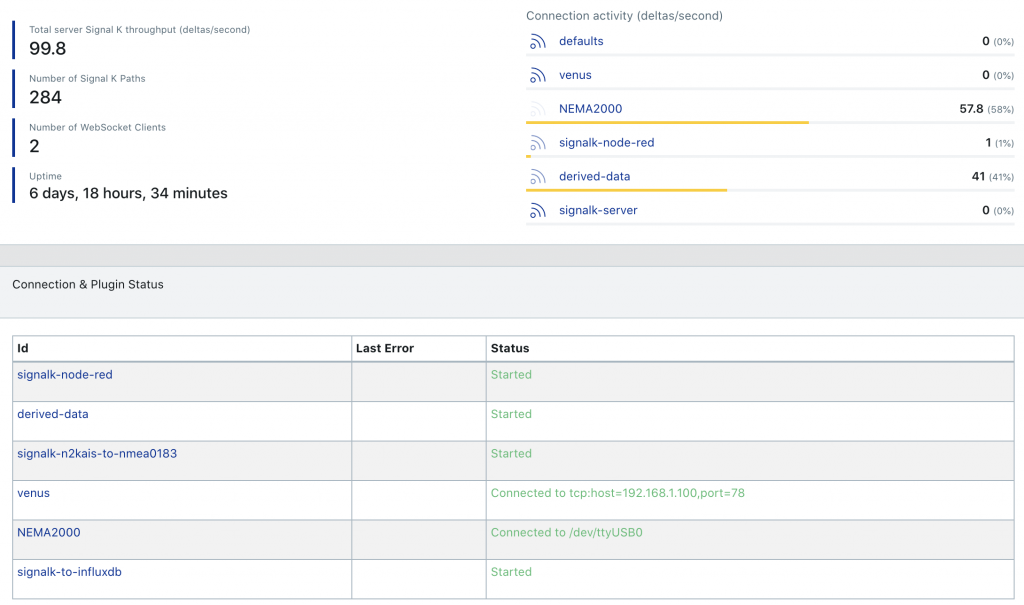
Lets wrap up now. My goal was to provide an overview of how I installed my Intel NUC as a central server for our boat. We covered an overview of how to get Ubuntu installed and the management packages that I added to the system. I briefly touched on a SignalK install but, provided some great Internet articles that cover the core SignalK + Influxdb + Grafana. When in doubt Google what you are stuck on. The answers are out there. In addition something I did not know until several months into the project but, there is a phenomenal group supporting SignalK and stuff around it on the Slack channel #signalk-dev. If you have never heard of Slack it’s a free messaging app widely used with software developers. Try to do your research first but, that is the main area to look for community support. If everything went well you should see something like this in your SignalK dashboard.
2 thoughts on “MV Telemetry – Part 2 NUC-NUC”
Is there something wrong? When I go to the ip address for at port 3000 I get the login for SignalK, not Grafana.
Rich Grafana and SignalK both by default use port 3000. Look back in the post and you can see that I configured Grafana to use port 4000. You will then need to restart Grafana.
Comments are closed.