Fixing Bilge Gelcoat Failure
I think we can all agree that water soaking into fiberglass is not on the list of good things for our boats. One area that seems to be a persistent problem is gelcoat failure in our bilges. There are a number of factors working against us here. First, folks don’t always or cannot easily inspect all points in their bilge. Second, water leaks are most likely to settle and pool in the lowest part of our bilges. Third, the bilges usually have bilge pumps, which are generally secured by screwing them down to the fiberglass, making nice holes for water penetration.

When we purchased our 2016 DeFever 49 it already was showing the tell-tale cracks in the engine room gelcoat floor in numerous spots. We had similar issues in our older 1991 Ocean Alexander bilge. Enter COVID and suddenly with lots of extra time on my hands it was time to “Get ‘Er Done”!
To set proper expectations for readers, my goal was to seal the exposed fiberglass from water intrusion and to have a paintable surface. I view having an engine room floor that is clean, dry, and pristine white as a critical part of preventive maintenance. It is not always an easy thing to achieve but, I find gives early warning signs to issues.
I researched what the steps were and products necessary to seal the surface with epoxy and apply a topcoat of paint. The steps listed below are an overview of the process which I followed. I will go into more detail on each step with the lessons learned.
Repair Process Overview
- Scrape and sand spots of gelcoat failure.
- Vacuum and clean with acetone.
- Clean with Interlux 202 fiberglass cleaner.
- Apply epoxy.
- Wash with soap and Scotch Brite pad.
- Prime surface with Interlux Epoxy Primekote.
- Paint with Interlux Bilgekote.
Now I know there is more than one way to seal and coat the fiberglass. Given that I was tackling this project in the late winter, I had to factor in the hull temperature was going to stay a consistent low 50’s due to the water temperature. I found that if I used a slow cure epoxy, I would be within the temperature guidelines. In addition, having some experience in the past with epoxies, I decided to expand my epoxy knowledge base.
Products Used
- Acetone
- Interlux 202 Cleaner
- West Systems 105 Epoxy Resin
- West Systems 205 Epoxy Hardener
- Interlux Epoxy Primekote
- Interlux 2333N Thinner
- Interlux Bilgekote
- Scott Brit pads
- Scott’s Blue Shop Towels
Warnings!
Warning – Many of the steps in this guide require the use of hazardous chemicals to breath. Read all warning labels and as such take every precaution to maximize airflow into the engine room compartment and wear a filter mask with the appropriate organic vapor cartridge. In all these steps I would run the engine room blowers and add additional fans to help exhaust airflow out of the engine room. We underestimated the toxicity of some of these chemicals and had one unfortunate incident where we had to abandon ship altogether for the night.
Warning – Many of the steps in this guide require the use of flammable chemicals. When disposing of any items such as rags or brushes with these chemicals proper care has to be taken so that they do not spontaneously combust and burn your boat up.
Step #1 Scrape/Sand the Substrate
When the DeFever factory yard laid down the gelcoat in our engine room I think they did a fairly poor job frankly. Given that I had a more than a dozen spots where the gelcoat had failed, I had my work cut out for me!
The tools I enlisted in my Arsenal of Doom included:
- Metal puddy knife 2”
- Plastic puddy knife 2
- Regular screwdriver (for use as a very small scrapper)
- Bosch adjustable speed triangle sander
- Bosch Dremel with goose neck and rotary sander drum
- Dental pick
- Telescoping mirror
- Jewelry hammer
- Festool vacuum with HEPA filter
- Face mask with cartridge filters.
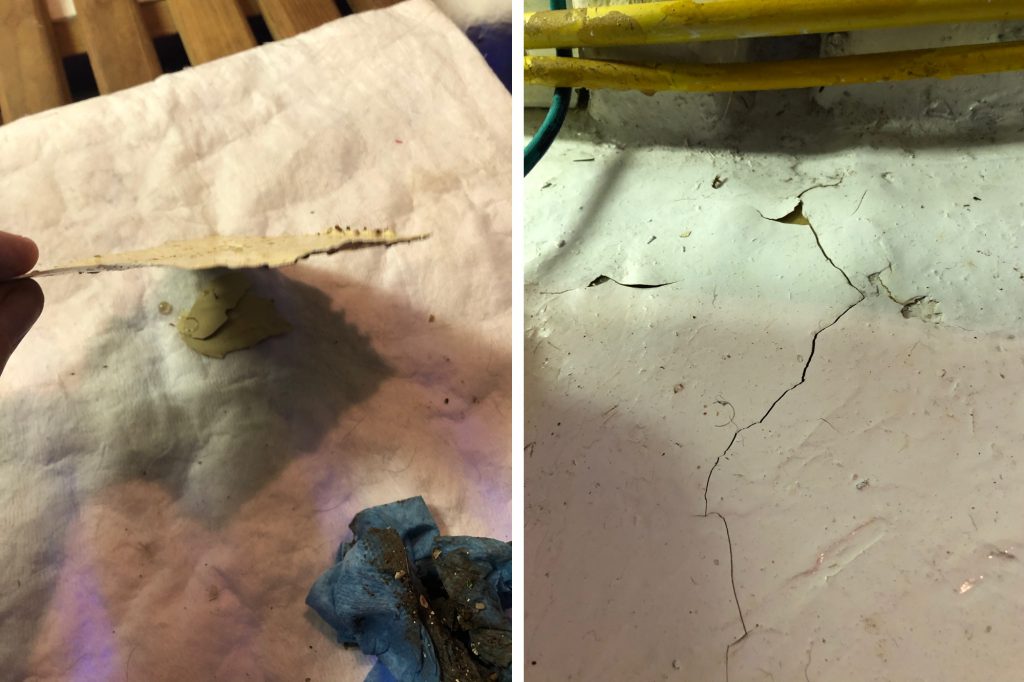
The gelcoat would usually fail and exhibit two types of symptoms. The first is where the gelcoat had released off from the fiberglass substrate in large pieces (see Photo #2 left). The second would be cracks in the gelcoat (see Photo #2 right) that would lead to a pattern of gelcoat failures radiating outwards. Sometimes one small crack would lead to gelcoat removal over 12” away.
I used a combination of scrappers as the primary removal option, and I could remove half the gelcoat that had completely failed. Then I would use a combination of the screwdriver and dental pick to trace out areas of gelcoat that would fail, radiating out from the original spot. I would commonly take my wife’s jewelry hammer and tape around suspect spots. I would see either the gelcoat flex or crack with even gentle pressure.
Once done with the scrapers, it was time to come in with the Bosch sander and Dremel to clean up the edges or small spots of gelcoat in the middle of bare fiberglass (see Photo #3). Since breathing fiberglass dust is dangerous, I made sure to wear my face mask.
My goal here was to suss out all weak spots so I could get all the repairs in one pass. Any suspect areas needed to be removed because epoxy over any unbonded gelcoat was just a recipe for future failure, and I didn’t want to have do this project more than once!
After a thorough inspection, I was ready to move to Step #2.
Step #2 Prepare the Substrate
Preparing the surface I’d just exposed was critical. The goal here was to get all the dust off the fiberglass and then make sure the surface was clean of any contamination. This way, I could make sure that the epoxy could bond well to the fiberglass. I hit it first with my Festool vacuum to suck up all the dust I could.
Next, it was time to start cleaning the fiberglass. I got out a roll of shop towels (I use Scott’s blue towels) and started by wiping down the fiberglass with a towel soaked in acetone. I would rotate and fold the towel until it would come clean when wiped.
Step #3 Clean with Interlux 202
Once I was done with the acetone clean, I repeated the whole wipe down with Interlux 202. This cleaner removes wax, silicon containments, and mold release agents, making for a squeaky clean surface. Once done, I had to properly dispose of the rags since Interlux is a flammable chemical that can spontaneously combust. Never fun.
I completed steps #2 and #3 in the same day. I was not in any hurry, so I decided not to do epoxy the same day.
Step #4 Apply 2-Part Epoxy
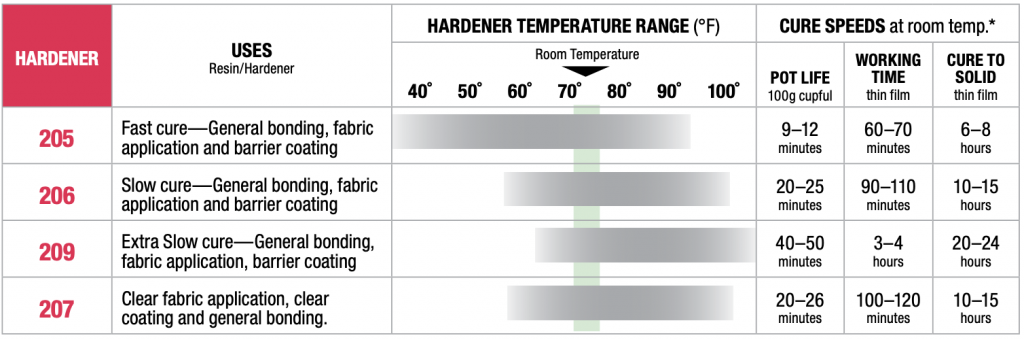
I used West System’s User Guide for epoxy. It’s free to download and covered the information I needed to select the appropriate epoxy resin and hardener combination. I consulted Table #1 (below) for the hardener to use in 50F temperature. I selected a combination of 105 Epoxy Resin and 205 Epoxy Hardener. Once you have selected your hardener, note the working time and pot time which are important to the batch size you make.
I bought my epoxy with the pump dispensers. Worked great since I had instructions based on the number of pumps. I would mix enough epoxy/hardener so that I could complete a single section of the engine room. Given that one can of 105 and 205 would make more epoxy than I needed for my whole boat, I was not worried if I wasted a few extra ounces. Three things I learned here:
- Follow the mixing directions exactly.
- Make small batches until you get familiar with the pot time and your own working speed.
- On larger surfaces that have a slope, the epoxy may sag a bit as it cures. For these surfaces, I learned to wait until nearer the end of the pot time when the epoxy was a little stiffer and use thinner coats.
I was happy that in my whole bilge I only had one spot that I got a sag drip line. I didn’t fuss too much since it was my engine room bilge but, your tolerance may vary!
Depending on your ambient temperature and hardener selection, you might need to wait several days for the epoxy to finish fully curing. For me being in cold lake water, I errored on the high side and waited till the following weekend giving seven days to cure.
Step #5 Wash with soap and Scotch Brite pad
Once the epoxy was fully cured, it was time to prep the surface for the Interlux Epoxy Primekoat. As the epoxy cured, it develops a dusty amine blush layer. This layer would prevent the primer from bonding correctly if not removed. That was easily be done by using a new Scotch Brite pad and soap and water. I rinsed everything down and dried it with lint free towels. Because I was working at a cooler temperature, I kicked on a heater in the engine room and waited 24 hours for surfaces to fully dry.
Step #6 Paint with Interlux Epoxy Primekote
First, let me say that you need to plan to be off the boat once the Interlux Epoxy Primekote is applied. The off-gas from Primekote was so strong that the wife and I had to leave the boat for two days after I set this stuff down. I would also recommend that no one else is on the boat with you unless they have a filter mask on. Yeah, it was that bad, and the Admiral was not happy that day.
Read the directions for the Primekote carefully. Mix up the two-part epoxy primer. Epoxy Primekote must be thinned a minimum of 25% before application with 2333N if you are going to brush or roller. I used a combination of foam brushes and a very small roller. As I mentioned already, the fumes are toxic.
I returned the next day applied a second coat. After two days, it was set enough to be able to return, but I waited a week to let the primer fully cure.
Step #7 Paint with Interlux Bilgekote
Home stretch. Whew! Once the primer was fully cured, it was time for the last coat with Interlux Bilgekote. This product was very much like paint, although not nearly as friendly as ordinary household latex paint. This was pretty straightforward using a combination of foam brushes and rollers. The fumes where not nearly as bad compared to Primekote. Still, we waited for a day where the weather was good and could open windows on the boat as we knew some fumes would leak up into the main cabin. I did not paint the whole engine room bilge but, did paint sections that had repair jobs.
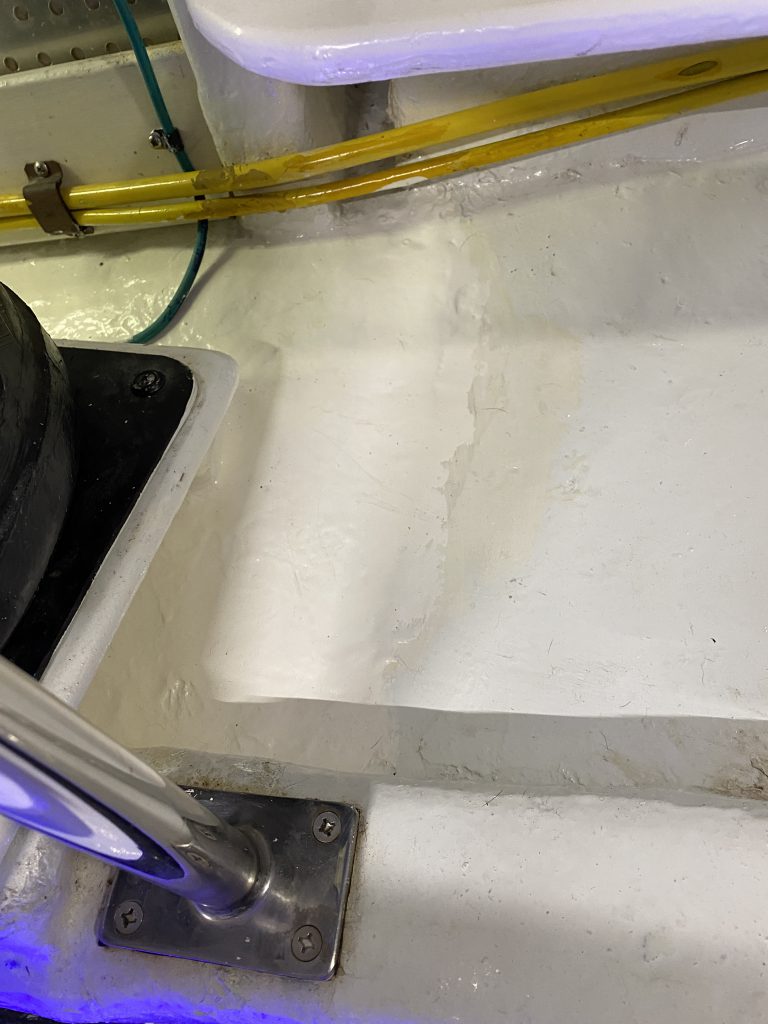
The below photo shows the same bilge section from the original photo. This is one year after the repair and it has held up well.
Summary
One year after completing this project I am very happy with the results and have seen no failures in the epoxy/paint. If I would factor in the total costs of supplies needed (minus sander/Dremel), the project cost less than $200. The skill set required is pretty low, and your success rate is pretty high if you carefully follow the preparation steps and are not in too big of a hurry. And who doesn’t love it when your hull isn’t rotting out from the inside?